If you sell on the Amazon FBA platform, then you know just how important it is to run PPC campaigns, especially at the early stages of the product launch. They make your product visible to potential customers even when there are no product reviews and the ranking is low. Using ads is simply a must for every seller.
People spend a lot of time analyzing and tweaking their ads, but what I have noticed is that not many talk about negative keywords, which are just as important to a profitable campaign as the normal keywords are. Negative keywords are those keywords that you do not want in your campaign. They are the keywords that do not generate sales for you.
Not only negative keywords do not generate sales, but they cost you money. Therefore, in order to save money and to maximize your profits, find out what your negative keywords are and make sure that you have included them in your campaigns.
How to add negative keywords to your PPC ads
Identifying negative keywords
There are two approaches which you can use to identify negative keywords. Let’s call them the straightforward approach and the analytical approach.
The straightforward approach
In the straightforward approach, you simply ask yourself, “through which of the keywords do I not want my product to be found?”
For example, you are selling an iron tray. As a result, you would expect people to find your tray by writing into the search bar “iron tray”. However, you see that there are also wooden trays being sold. In this case, people can search for “wooden tray”.
Recommended: MARKETPLACE SUPERHEROES Review: Step-By-Step Course Towards Selling Physical Products on Amazon FBA
Both search terms, “iron tray” and “wooden tray”, have the word “tray” in them. So if someone types in “tray”, they will see all types of trays. For us, this is ok, since the person may pick our tray over the other trays that are sold, regardless of whether they are wooden, plastic or iron.
However, we definitely don’t want to be showing up in the search results when people search for a “wooden tray”. Why? Because that person is not interested in iron trays! They are interested in wooden trays. If our tray does show up, we will either generate no sales, or worse, begin to lose money due to wasted clicks.
We can agree that with the given example, your first negative keyword would be “wooden tray”. To that, you may want to also add “plastic tray”, “green tray” (if your tray is red), “square tray” (if your tray is round), etc.
The analytical approach
I call this approach “the analytical” because here you identify negative keywords based on the data that you have gathered from your already existing Amazon FBA PPC reports. So as you may have guessed, this approach is for those that have already been running PPC ad campaigns for some time, preferably a month at least.
1. Create the report
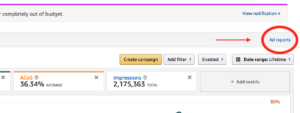
The very first thing to do is to log on to your seller central account. Then you click on advertising, and then you click on “Ad reports” in the upper right corner.

After clicking Ad reports, you will be presented with some options. You can choose whatever you want, but I usually just go with Report type -> Search term, Report period -> Customized (as long of a period as I can pick), Data unit -> Total.
2. Download and open the report
Then you click on “Create report”, and the report is generated. After it has finished generating, which usually takes just a bit, you download it.
Recommended: Amazon FBA: The Mistake That Could Have Cost Me $3000
The report comes in a .xlsx format, which should be opened with Excel. If you don’t have Excel on your computer, you can use the free online solution – Google sheets, to open it. Just click on open inside of Google sheets and upload the .xlsx file.
3. Set the filters
When you have opened the file, you want to highlight all of the data on that sheet (Ctrl + A for Windows, Cmd + A for Mac), click on the “filter” icon, and then choose filter again if you see a drop-down list. This will allow you to filter the results based on different columns, which is something that we need to do.

Once you have clicked on filter, you will now have an arrow show up at the top of each column. You can now click on those arrows.
If you are running ads for more than one product, you will want to remove from the results all of the products except the one that you are interested in at the moment. If you are interested in identifying negative keywords for the “tray” product, then you remove everything except the tray.
Also, if you have many different types of campaigns running, you want to see the results only for the automatic campaign. We choose the automatic campaign because we are interested in seeing through which search terms Amazon displayed our product to its customers.
Pick column “Campaign name” and remove all campaigns except the one automatic campaign that we are interested in.
Then go to the “Spend” column and filter it by “Descending”.
4. Identify the keywords
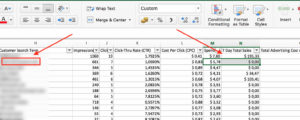
At this stage, there are many ways to go about looking at your data, but the easiest approach, in my opinion, is to look at the rows that have the highest spend, while having no sales under the “7 Day Total Sales” column.
From the image below, you can see that there is a $5.78 spend and $0 sales. I will then look at the keyword found on the same row under the “Customer Search Term” column. I mark that keyword down.

It is up to you to decide how many negative keywords you want to mark down. I usually go only for the ones that are above 2$ spend and no sales.
Recommended: What to Sell on Amazon FBA and What to Watch out For
If you see that a random keyword only once caused your product to be clicked on, then it probably isn’t a big deal. However, if you see that an unrelated keyword is generating many clicks on your product with no sales, then you should remove it immediately.
Uploading your keywords
Once you have a list of keywords that you want to mark as negative, all you have to do is go to your campaign manager -> click on the automatic campaign related to the product that you want to adjust -> click on “Negative keywords” ->

add in the keywords, and voilà! You are done. Now you will be spending less and generating more.
Ideally, in order to maximize the profits from your Amazon FBA PPC campaigns, you want to clean them up every once in a while. I think every two months is a good time period.
The process of identifying and adding negative keywords to your campaigns is not difficult. It only takes 15 minutes, but you end up saving a lot of money that can then be used to generate you more income. You don’t simply save money, but you use that money to make money. So as you can see, it’s quite important to any Amazon entrepreneur.
Hopefully you found this post useful. If something is unclear, feel free to leave a question or comment down below. I will do my best to answer it as quickly as possible. Alternatively, you can try watching the YouTube video attached to this post. It might be easier to follow.
Thank you for stopping by and good luck!
Please click below to subscribe and to follow us on social media:
Click here to follow us via E-mail!
Click here to follow us on Facebook!
Click here to follow us on YouTube!
Click here to follow us on Instagram!
Click here to follow us on Twitter!


 15 Best Inspirational Movies That Teach to Never Give Up
 50+ Best Self-Help Books That Will Change Your Life Forever
 Short Motivational Stories of Failure and Success That You Must Know
 10 Examples Where the Power of Positive Thinking Kicks Ass!
 What to Do When Someone Is Better Than You? – Dealing with Jealousy

Leave a Reply